I love to weave. I have made full-sized baskets to miniature baskets. I think it's relaxing to weave.
Weaving miniature furniture is a great "take it with you" project. Once you have your wires glued in you are good to go. No mess, no fuss, at least while you are weaving you don't need anything but your chair and thread.
This is a picture of a set of chairs I started some time ago, things have gotten in front of their getting finished. I developed this pattern over time looking at old catalogs of full-sized wicker furniture.
For this project I am going to use waxed linen. This is what the very talented artisans use for weaving their furniture.
I purchase this thread from Royalwood Ltd. at
Royalwoodltd.com
This thread is not cheap, they do offer bulk discounts. For 1 inch scale furniture we use the 3 ply. There are several beautiful colors available.
I have a tutorial using painted size 10 crochet thread, "How to make a 1 inch scale wicker table and faux tile top" in the "Things to do, Things to see" list at the left of the blog. In that tutorial I show how to use the crochet thread for weaving. You can use the crochet thread for trying out the diamond weaving pattern I begin this tutorial with. I have also experimented with using beeswax to wax the size 10 crochet thread. You don't have to cut the thread to length, just wax a bit at a time as you weave. The size 10 is a little small when waxed in my opinion. If you want to use crochet thread try using a larger size. Hobby Lobby has a large selection of thread to choose from and it wouldn't be a bad idea if you are just wanting to try weaving a chair to see if you like to weave. Using the waxed crochet thread would certainly be more economical and easier to get. I find the beeswax in the sewing notions at Hobby Lobby or Joann Fabrics.
Why waxed linen thread? The wax on the thread makes the weaving easier. The thread doesn't un-weave itself. The paint I used in the table tutorial essentially does the same thing.
Here are Nancy's wonderful patterns for us to use. Refer to the HOW TO RE-SIZE THE PATTERNS in the "Things to do, Things to see" list for instructions.
Print them out on card stock first for tracing. I then printed the seat pattern, the one with the green dots onto plain paper to glue to the top of the seat.

This is the finished chair for the tutorial.
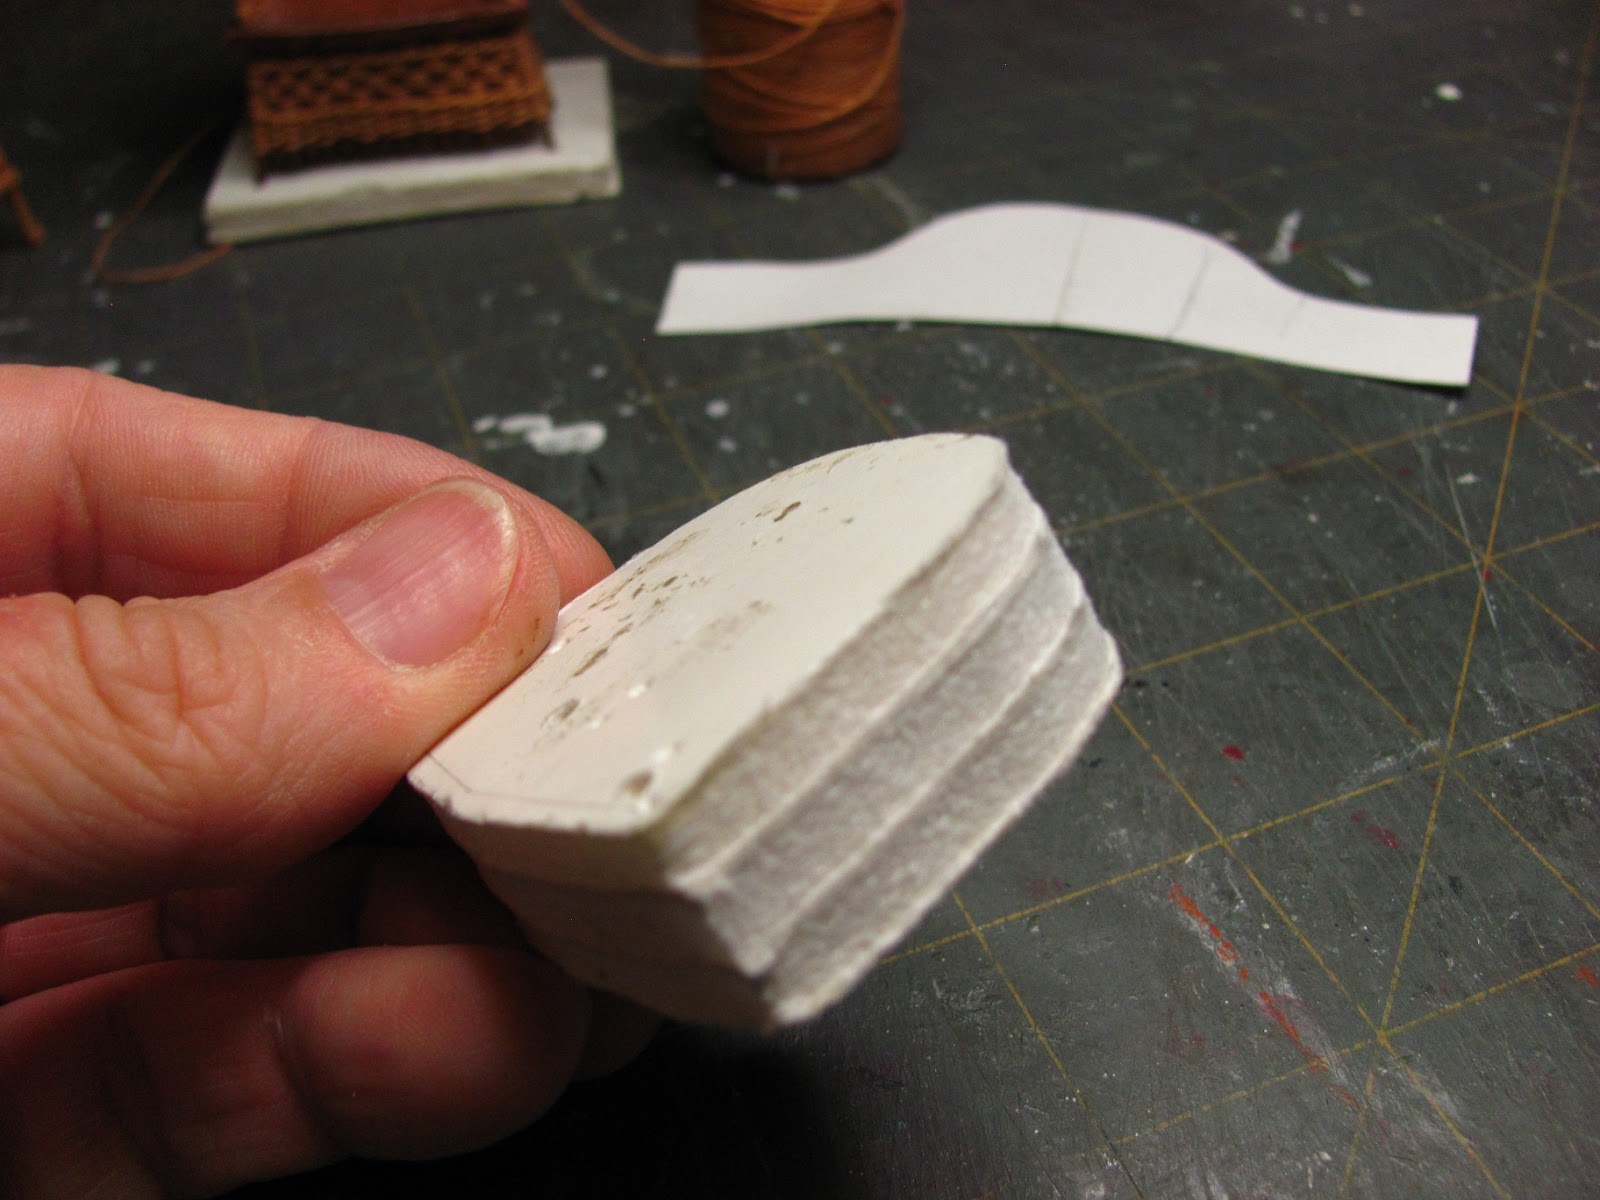
I make a form for bending the wires. This makes a better finished chair.
The form fits around the wires and sets on the edge of the seat.
Showing another picture of the form.
To make the chair form you will use the foam core pattern to trace 3 patterns onto foam core. Cut these out and glue together, keeping the edges even.
Using Nancy's patterns copy the form pattern several times onto card stock. Use yellow carpenter's glue to glue the layers together.
I've made the pattern for the foam core longer for you so you won't have the fronts of the form hanging out.
Press your card stock pieces around the foam core firmly. This is going to be your form for bending and shaping your chair.
I used several layers, my form measures about 1/8 inch thick.
Good and smooth around the back.
As you add layers keep the bottom edge even with the bottom of the foam core. The form will tip out around the outer top edge, it's supposed to do that.
Let's talk about wire. When I started weaving furniture the wire was easy to find, Walmart carried it in their floral department. Then it disappeared and has been harder to find. I have to buy it on-line.
I found it lately at
www.papermart.com
It's under floral stem wire, this wire is called cloth covered, it is wrapped with thread.
20 gauge white, for the legs, item number 39-582819, 15 pieces, $1.03. 26 gauge white for the rest of the chair, item number 39-586820, 305 pieces, 36 inches long, $19.35. If you have a club or a friend you could share in this purchase. You do use more of the 26 gauge since it's the rest of the chair.
You need a sharp pair of wire cutters, sharp enough to not only cut the wire but the blasted thread, too!
After you've cut the wires to length you will use the yellow carpenter's glue to seal both ends. This is tedious but it's a must do. Let them get good and dry before you use them.
Let's try a little weaving.
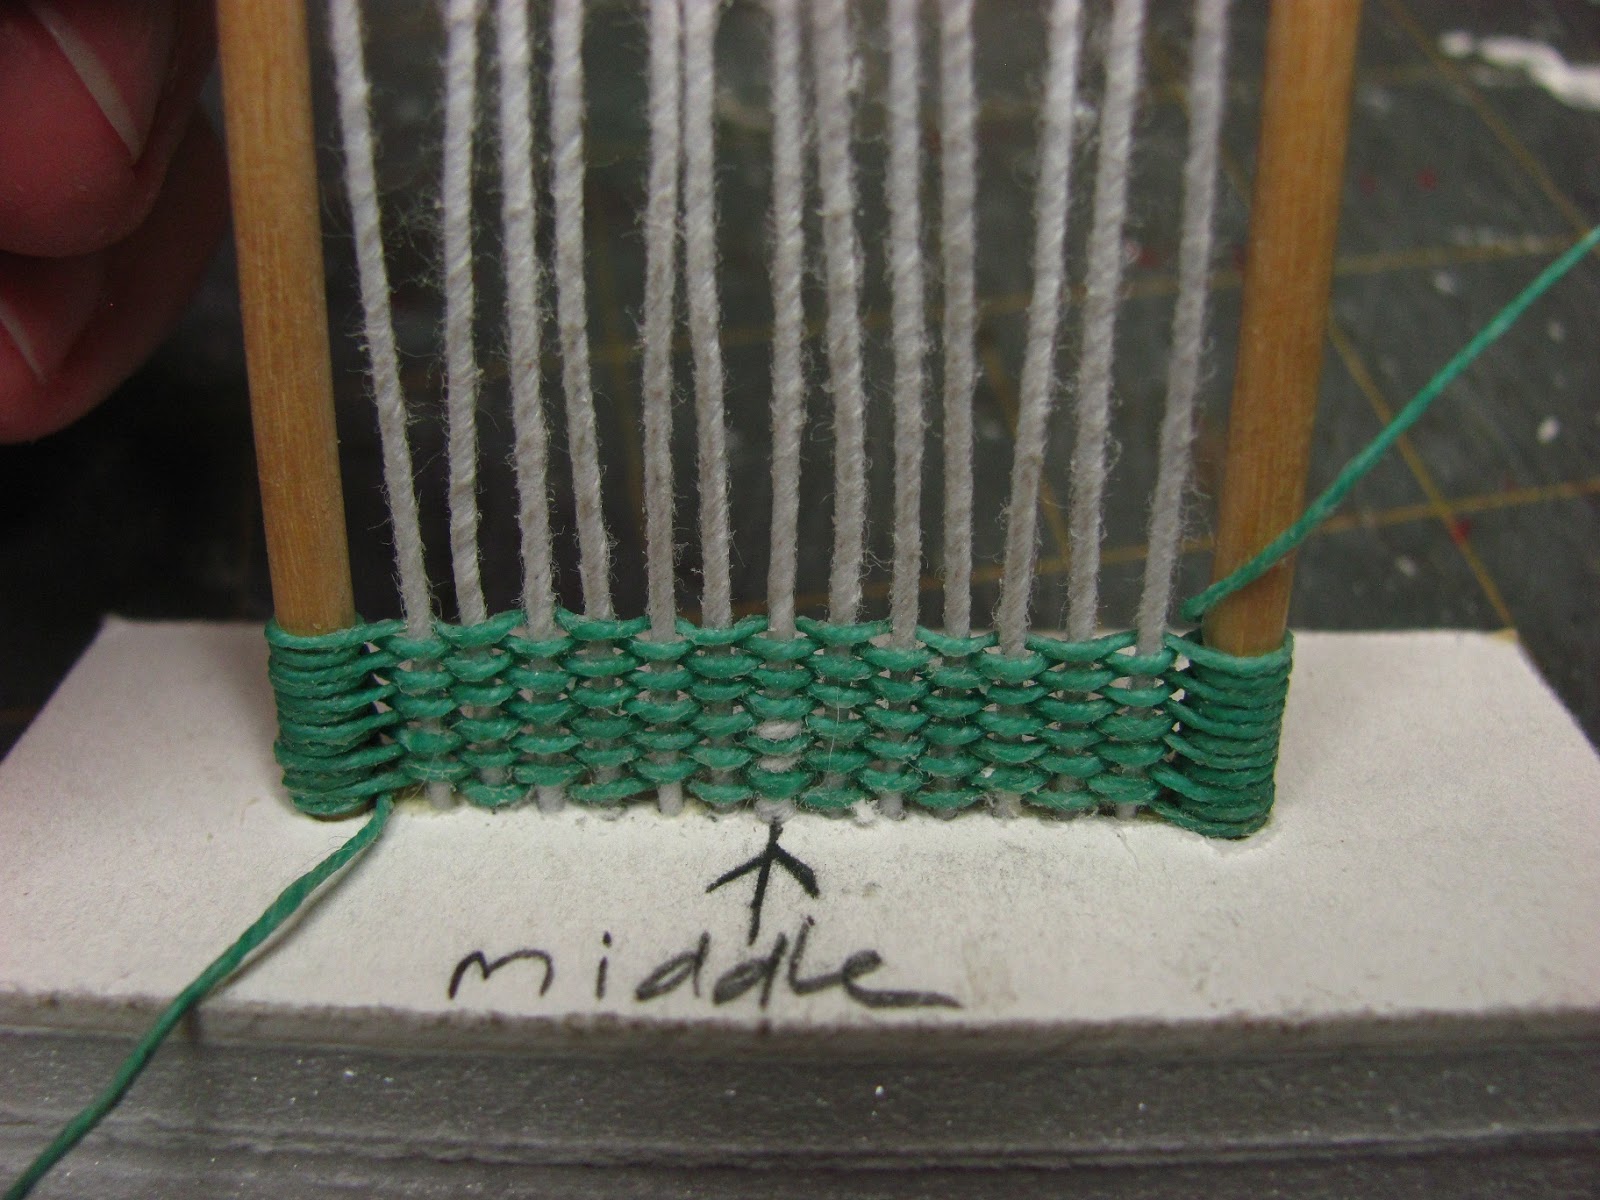
Glue two pieces of foam core together. My pieces are about 3 inches long and a little over an inch wide.
I marked the middle. From the middle I measured 3/32" and marked 7 times on each side of the middle with 3/32 " between each mark.
Cut 2 - 1/8" dowels about 2 1/2" long and cut your wire the same.
For this trial you could use plain wire, wire that is not wrapped with thread. Try to find something close to 26 gauge. Don't go smaller, the larger the number the smaller the wire. If you have to use a different gauge use something larger, 24 or 22.
If you are using the thread wrapped wire seal both ends with yellow glue.
Use a drill to drill holes where your marks are. It's all right to drill through the foam core.
Use the yellow carpenter's glue to glue the dowels and wires into the foam core.
Mark the middle wire.
If I haven't mentioned it before I am left-handed so if any of this seems backward to you I apologize.
Wrap the thread twice around the dowel.
Begin to weave, plain weave, over, under, over, under.
Over and under and you are across.
Double wrap the right dowel.
Look at the right dowel, it's been double wrapped. You will have to do this almost every time to fill in. Most of the time I just double wrap every time.
Go back across alternating over and under.
Don't pack the thread down or pull it tight. After some practice you will get used to the tension you should have.
I've woven 10 rows.
I am going to begin the diamond pattern by weaving over to the left with the same plain weave, over and under, double wrap the dowel.
From my pictures I see that I have woven one more plain row to the left.
You can start this pattern from either side.
I have woven the 13th row. This row shows the pattern beginning.
I double wrapped the dowel.
I've woven under, over, under and over the first 4 wires.
Then I've gone under 2 wires, over the 7th (middle) wire.
Weave under the next 2 wires and begin the plain weave again, over, under, over and under. Double wrap the dowel.
I've double wrapped the dowel and wove over and under back to the left.
Now I have 3 threads on top of the middle wire. That's the beginning of the diamond.
Double wrap the left dowel.
Plain weave over to the right dowel and double wrap.
I am beginning the pattern on this row.
Over, under and over.
Weave under 2 wires.
Weave over, under and over.
Weave under 2 wires.
Weave over, under and over.
Double wrap the dowel.
Weave back to the right, under, over and so on.
Double wrap the dowel.
Now we have 3 threads over the 2 wires on either side of the middle wire.
Plain weave over to the left and double wrap the dowel.
Weave under, over and under 2 wires.
Weave over, under, over the middle wire and under and over.
Weave under 2 wires and over and under.
Double wrap the dowel.
Plain weave back to the left and double wrap the dowel.
Third row of pattern is now done.
Plain weave to the right and double wrap the dowel.
Weave over and under 2 wires.
Weave over, under, over and under the middle wire, over, under and over.
Weave under 2 wires and over the last wire.
Double wrap the dowel.
Plain weave over to the right and double wrap the dowel.
I now have 4 wires with 3 threads on them.
I am now going to begin to narrow the diamond.
Plain weave to the left and double wrap the dowel.
Weave under, over and under 2 wires.
Weave over, under, over the middle wire, under and over.
Weave under 2 wires, over and under.
Double wrap the dowel.
Plain weave to the left and double wrap the dowel.
I now have 3 wires with 3 threads on them.
Plain weave over to the right and double wrap the dowel.
Weave over, under, over and under 2 wires.
Weave over, under the middle wire, over and under 2 wires.
Weave over, under and over.
Double wrap the dowel.
Plain weave to the right and double wrap the dowel.
Pain weave to the left and double wrap the dowel.
Weave under, over, under, over and under 2 wires.
Weave over the middle wire.
Weave under 2 wires.
Weave over, under, over and under.
Double wrap the dowel.
Plain weave to the left.
That's the last row of the diamond pattern.
I wove a few more rows.
This diamond is larger than the one on the chair.
So, how did you like that?
Print out a few of the seat patterns onto plain paper.
Use tacky glue to glue two pieces of mat board together.
Smear the glue around by sliding the mat board back and forth a bit.
Align the edges and press together.
Cut out one of Nancy's patterns and use glue stick to glue the pattern to the doubled mat board.
There you go.
Use a "T" pin to mark the holes to start your drill bit.
Use the smallest drill bit you can for the holes.
Test your wire out on scrap mat board.
Be sure you have sealed the ends of the wires before you try to insert it into the holes.
Cut the seat out. I have to admit I used my scroll saw.
Christmas is only 6 months away, put a bug in Santa's ear!
I have a diagram for you to look at for the measurements for your wires. Cut 17 wires for the back. That's 4 more than there are holes for, yes. You will glue in 13 - 26 gauge wires. The next wires are the back legs, that's 20 gauge wire, those are glued in. The 4 extra wires are glued into the seat after the back legs, 2 on either side of the legs.
You need only cut 9 wires for each side since you have all ready have 2 on each side now.
The front corners have the front legs, 20 gauge wire. Then there are front wires, 26 gauge only 7/8 inch long.
Seal the ends and let dry.
The wires need to be marked, measure and mark from one end -
front legs 1 1/8"
side wires 3/4"
back legs 1 1/8"
back wires (including the 4 extra for the side) 3/4"
You don't need to mark the front wires, they will be glued in even with the top of the seat.
There are all of my wires cut, sealed and marked.
And Digger is helping me.
Glue the 2 back legs in first.
I insert the wire past the mark, apply a little yellow carpenter's glue on the wire and push the wire back into the mat board. I have the mark on the wire at the bottom of the mat board seat, just into the mat board.
Use a ruler to measure the amount of leg from the bottom of the seat. Make sure they are all the same. You can get into a little game of snipping off a bit to even things up and end up snipping off too much all around. Believe me, I've done that, when all the weaving was done!
I've glued in the 2 longer side wires in front of the back legs.
All the back wires are in.
Showing how I apply glue to the wire and now I am going to pull the wire into the seat just so the mark is just into the mat board.
Side wires and front legs are glued in.
This needs to dry, really dry so the wires won't be moving around when you are weaving.
I left mine set over night.
I am making a jig to set the chair in while I weave it.
I find that the finished chair is nicer if the legs are held in this jig.
Trace around a seat pattern onto 1 layer of foam core.
You can change this position to your taste but this is how I like my legs.
The front legs a little out from the corner and the back legs about an 1/8 inch out from the edge of the back.
After the glue was dry I put my chair into the form to shape the legs.
Side view.
I've set my form onto the seat of the chair.
Showing another view.
I took the form off the seat and I bent my wires out a bit.
I set the form back on to check the wires.
I will do this a few times to get the wire to match the shape of the form.
I have slightly bent the wires over the top of the form.
I am going to begin weaving.
I have started on the left, you can start on the other side if that's what you are comfortable with.
I have double wrapped the front leg and have begun the over and under plain weave.
I have woven around 9 rows or 1/4".
Remember to double the the front wires. Don't pull on the thread or you will pull the front leg wires in and the arms will not be straight.
I am wrapping the thread around the wires to make a decorative row that will separate the next few rows from the plain weaving.
Showing some more.
Wrap the thread this way over to the other side of the chair.
I'm on the left side now.
This is what the pattern looks like from above.
I have woven to right side with a plain over and under weave.
I am beginning a pattern of 3 rows with the same weave, can you see the beginnings of this?
I am on the left beginning the third row of the pattern.
Don't forget to double wrap the front legs.
I'm on the right side of the chair, now. I am beginning the first row of the next pattern.
I finished weaving to the left and I wove back to the right side. I am weaving back to the left side.
This is the first row of the last of the pattern. I am weaving to the right side of the chair.
I wove the next two rows and ended on the right side of the chair.
I am now weaving the decorative row again to separate the pattern from the plain over and under weave.
That's done and I'm back on the left side.
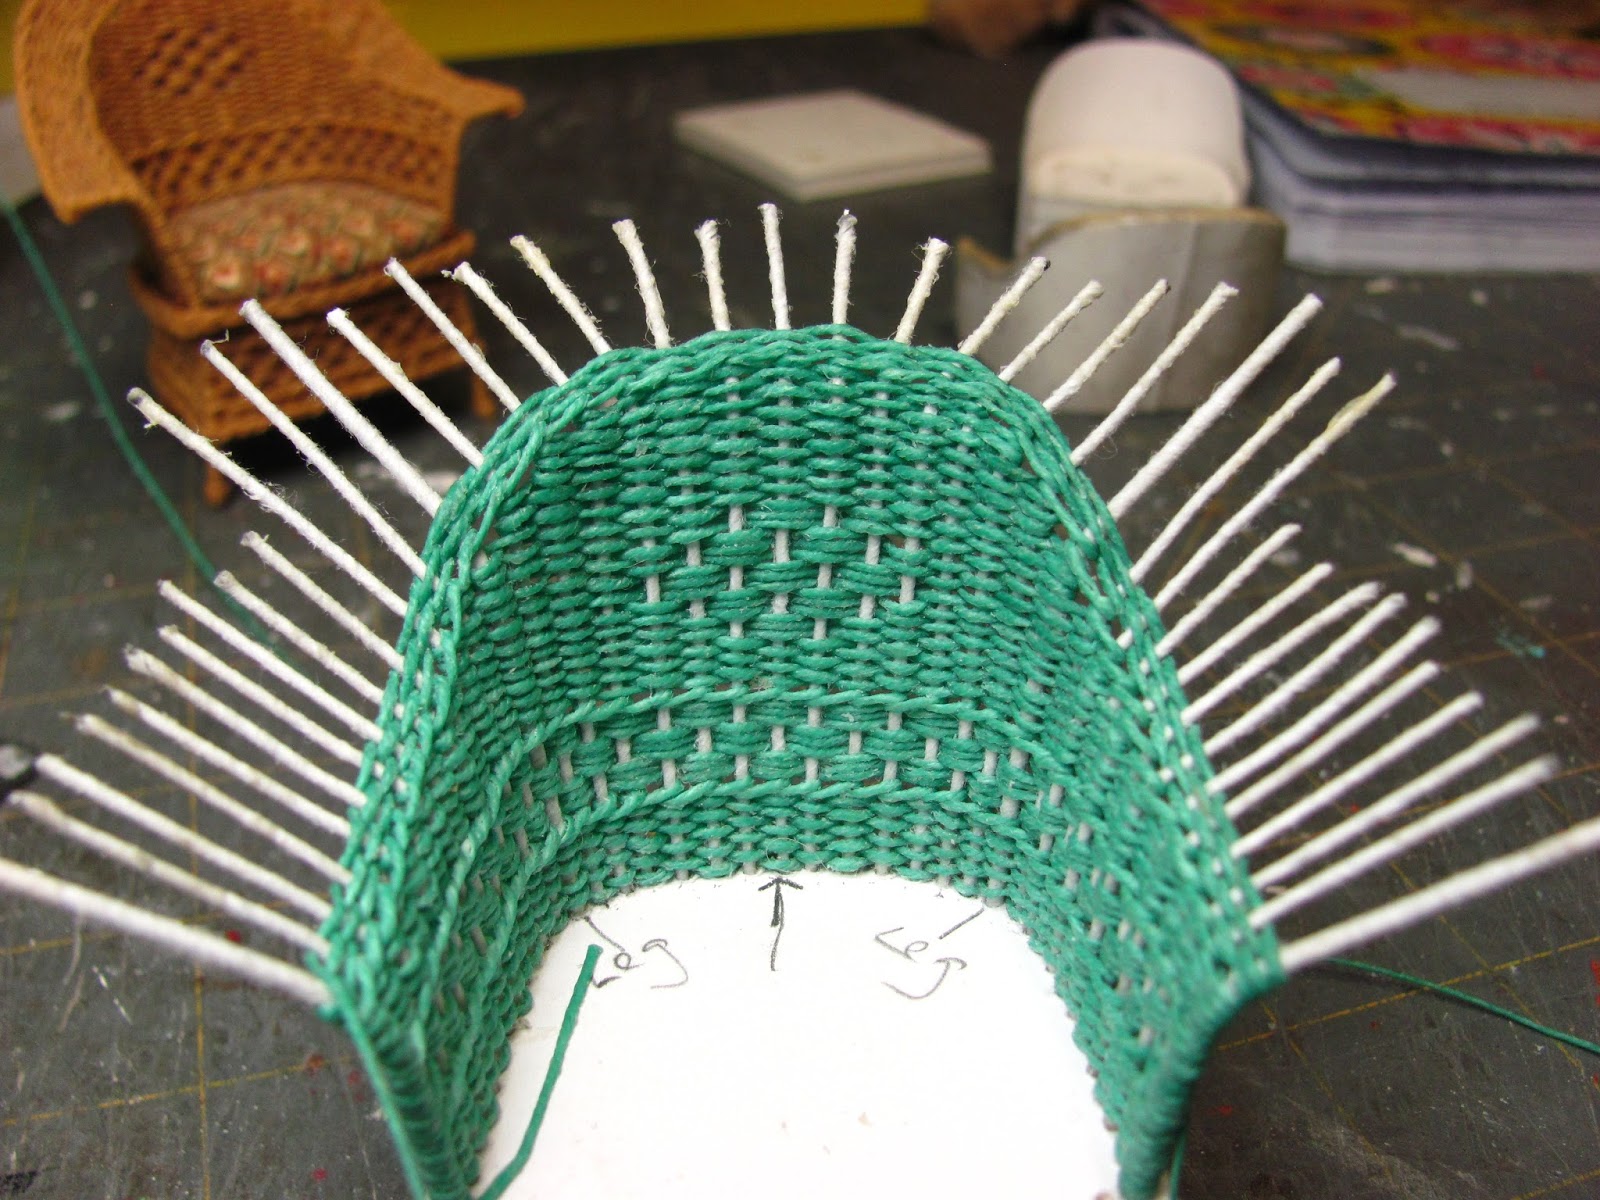
Not only do I use the form for shaping the wires out I also use it to show me where to start decreasing to shape the top of the chair.
This is good for you, too. We all weave with a different tension. Where I weave 10 rows you might weave 9 or 11 and get the same width measurement.
I am going to weave the over and under plain weave for about a 1/4". This is measured at the center back of the chair.

I set my form on the seat and saw I needed to start decreasing to shape the back of the chair.
We will decrease at the same time the diamond is being woven into the back.
I've stopped weaving on the fifth wire from the front. I am counting the front leg wire.
My tweezers are on the fifth wire from the front. I've wrapped the thread around the wire and have begun the over and under plain weave back to the middle to weave the diamond.
I am going to begin the diamond in this row.
I've marked the middle of the chair.
Weave to the 2 wires before the middle wire.
Weave under the 2 wires, weave over the middle wire, under the next 2 wires.
Continue the over and under plain weave to the left side.
Stop on the fifth wire, wrap the wire and plain weave to the right side of the chair.
The first part of the diamond is done.
I have my form on to check on the decreases.
I have stopped on the ninth wire.
I have wrapped the ninth wire and have begun the over and under to the left.
I'm in the middle of the back weaving the first row of the second pattern of the diamond.
I'm on the left side of the chair, on the ninth wire.
I wrap the ninth wire and begin to weave to the middle.
I am showing the form on the chair.
Look at my picture closely to see the 2 wires I wove under.
NOT counting the middle wire I wove under the second and third wire from the middle.
I wove over, under the middle wire, over and under the next 2 wires.
I am staying at the ninth wire.
I wrap around the wire and begin to weave to the left side.
I set my form on and I am decreasing again. I've stopped on the eleventh wire.
Wrap around the eleventh wire and weave over and under to the right side.
I wove to the right, stopped on the eleventh wire. I wrapped around that wire and wove to the third and fourth wire from the middle.
I wove under both the third and fourth wires and wove over, under, over the middle wire, under, over and under the next 2 wires.
I wove to the eleventh wire, wrapped it and wove to the right side of the chair.
According to my form I am decreasing on the twelfth wire.
Weave back to the right.
I am on the twelfth wire and weaving to the middle.
Weave over and under to the second and third wire from the middle wire. Weave under the second and third wires, weave over, under the middle wire, over and under the next 2 wires.
Weave to the twelfth wire, wrap the wire and weave to the left side.
I'm on the left side. I only have one more pattern row of the diamond to weave.
I am still on the twelfth wire, I wrap it and begin to weave to the right side.
I am on the right side with my form on the seat of the chair.
I am stopping on the back leg.
I wrap the back leg and weave under, over, under, over and under the first and second wires from the middle.
I weave over the middle wire, under the next 2 wires and over and under to the back leg.
I wrap the thread around the back leg and weave to right side of the chair, to the back leg.
The diamond is done.
I wrap the back leg again and plain weave to the left back leg.
I've got my form on again and I am still using the back leg to weave on. Plain weave to the other back leg.
I'm still using the back leg for weaving. Wrap it and plain weave to the left back leg.
With the form on again I am moving to the first wire past the left back leg. Wrap that wire and plain weave to the right back leg.
I've set the form on again and see that I will decrease on the first wire past the back leg.
Wrap that wire and plain weave to the left.
I am using the first wire after the back leg again. Wrap that wire and plain weave to the right.
Use the same wire, wrap it and plain weave to the left.
I have moved to the second wire after the left back leg, I wrapped it and wove to right.
I am still using the first wire on the right side, I wrapped it and weaving to left.
I am using the second wire again. I wrapped it and I'm weaving to the right.
This time I have moved to the second wire.
I've wrapped it and I am weaving to left.
I am using the second wire again. Wrap the wire and weave to right.
I am still using the the second wire from the right back leg.
Wrap the wire and weave to the left.
I am now using the third wire from the left back leg.
Wrap this wire and weave to the right.
I'm on the third wire from the right back leg.
Wrap this wire and weave to the left.
I'm still on the third wire on the left.
Wrap this wire.
I'm at the top of the form.
Cut the thread leaving about 6 to 8 inches to work with.
Use a needle with a eye that's large enough for the thread to go through but not too big that the needle will be hard to pull through the weaving.
On the back of the chair I inserted the needle under a couple of rows of weaving.
Clip the thread close to the chair.
Thread the needle with the thread from the spool.
Insert the needle into the weaving, two or three rows, this is at the side right after the front leg.
Pull the thread through. Remove the needle and leave the thread tail on for now.
Wrap the front leg twice and begin weaving a decorative row.
This decorative row will mark where the arms of the chair will bend over.
Weave this row all around the edge of the top of the chair to the left side.
Double wrap your front leg and begin to plain weave around the top of the chair.
Plain weave around the top of the chair, double wrapping the front legs for 3/8 inch.
After a few rows set the form onto the chair and bend the wires to a 90 degree angle for the arms. The top of the back I only tip slightly.
I have about 3/8 inch woven now.
Cut your thread leaving about 6 to 8 inches to work with.
Thread your needle again.
Insert the needle into the weaving underneath the arm.
Pull the thread through.
Clip the thread off close to the chair.
Clip the starting thread close to the chair.
Now, that's all tidy.
Apply tacky glue to the underneath edge of the top of the chair.
Like this.
I can't believe I didn't take a picture of the front wires being put in.
Glue the front wires into the holes in the seat. Keep the ends of the wires even with the top of the seat.
Let these dry thoroughly or you will have problems weaving.
I begin with a back leg. Wrap a back leg twice and apply a bit of glue.
Plain weave around the chair.
I double wrap the front and back legs for the plain weaving.
When you double wrap the legs make sure you continue with with weaving correctly.
Look in the picture above. I was going under the front leg and over the first side wire.
I double wrapped the front leg and wove over the next wire to keep the weaving correct.
I have woven to the back leg.
I've woven three rows.
At the back leg where you started begin weaving a decorative wrap around the bottom of the chair.
I am going to weave three pattern rows like I did in the top of the chair.
Plain weave around the chair. I double wrap the front legs but I do not double wrap the back legs for this pattern. This is my design choice, maybe not yours?
Since I am weaving a circle I have to adjust for the pattern. When I get to my starting point I have to weave under 2 wires to maintain the pattern on the middle row..
Weave a third row for the first pattern.
I have begun the first row of the second pattern, it's shown on the left of the picture.
To start the second row of the second pattern I had to weave over 2 wires. Continue to weave around the bottom of the chair.
I've started the third row of the second pattern.
I've got the second pattern woven.
I've begun the first row of the third pattern.
I have woven the first row of the third pattern and have begun the second row. Do you see that I have woven under 2 wires to keep with the pattern?
For some reason Blogger isn't letting me type at the side of the picture anymore??
I've woven the second row and have begun the third and last row of the pattern.
Now it's back?
I have begun the decorative wrap. Weave all around the bottom of the chair.
After weaving one decorative row plain weave for six rows.
When you get to the starting leg wrap it to the bottom.
You can apply some tacky glue if you want.
When I get to the bottom of the wire I wrap up for 3 to 4 rows.
I do apply glue under this wrap.
Apply tacky glue to the ends just like you did on the top of the chair.
The bpttom is a little short to thread a needle to bury the thread.
I glue the end down and wrap the other three legs.
Trim off the extra wire very close to the weaving.
That's done.
To finish the top and bottom edges I braid the thread.
You will need at least 8 inches of braid for the top of the chair. Cut three pieces of thread at least 12 inches long.
You will need at least 7 inches of braid for the bottom of the chair. Cut three pieces of thread at least 12 inches long.
For the edge of the seat I cut six pieces of thread 12 inches.
I braid this to make a thicker braid.
Here are my three braids.
Use tacky glue to secure the braid to the chair.
I am sorry for the blurry picture.
Fold the end of the braid over the front edge of the arms.
You can hold this with a small clamp until it dries.
That's better.
Another picture.
I've glued the bottom braid on and the wider braid for the edge of the seat.
The seams are on the back of the chair.
Trace the seat cushion pattern onto one layer of mat board.
Cut the mat board out and trial fit into the seat of the chair. Make sure there is room for the mat board and the fabric.
Cut three pieces of Thermolam Plus, Sew In, for the batting.
I buy this at Walmart.
I have the sizes graduated.
Use tacky glue to glue the batting onto the mat board.
Start with the smallest piece. Do not glue the batting together. Apply glue to the mat board only.
Cut your fabric a little larger the the seat cushion.
Cut out "V" notches around the back curve.
Use tacky glue to glue the fabric to the underside of the seat cushion.
Glue around the curve.
Glue the front and sides, bring the front corners together, tightly and glue them down.
Cut the extra fabric from the corners.
Glue the little slivers of fabric down.
Glue the seat cushion into the chair.
This is a serious project with some investment in materials. It takes time to make it. Weaving is very satisfying, though and I hope you try it out.
If you have any questions or want to add a picture of your finished tutorial please e-mail me at
camceiling@frontiernet.net
Have fun, Expand on it, Make it better . . . . .
Just Keep Making Minis
Talk to you later, Kris