What can I say . . . . except I have the greatest followers!!
Other names may be: mount board, book board, illustration board or birstol board.
In Danish: passepartoutkarton and it may be sold in artists shops.
And . . . . someone looked on Danish e-bay and found some for sale in A-4 size.
So, I hope this helps because you have got to start building some furniture!
You all have a great holiday season and I'll see'ya next year . . . . . . . . Kris
Friday, December 21, 2012
Thursday, December 20, 2012
Denmark needs mat board
I am hoping my followers can help out a fellow miniaturist. This miniaturist lives in Denmark and can not find mat board.
I am told your Google is different than mine. Mat board may also be called something different.
What I am calling mat board is used to "mat" photographs when framing. It's the 1/16 inch thick piece of card board that is under the glass, then the photograph is under the mat board, the mat board will have a hole cut out so you can see the photograph. It is used to enhance or decorate the photograph's edge. It can come in colors, I use the white. Businesses that frame pictures usually will have this product. Art supply stores may also carry mat board.
Can anyone help with the Google search and post the answer? I will keep a watch and publish a post.
Thank you, Kris
Tuesday, December 18, 2012
SEWING BOX ON LEGS TUTORIAL - How to make a 1 inch scale sewing box on legs with mat board.
This is my Mary Engelbreit room box. We are going to make the sewing box next to the rocking chair.
My husband sawed the strips for the floor. I masked off a border and painted a pattern I copied from ME post it notes.
I tried my hand at mini needlepoint, not my favorite. The rocking chair is made from beech wood, it looks like oak, but mini size. The pattern for that and the mirrored shelf in the hall came from "The Mott's Miniature Furniture Workshop Manual". I copied the door from a magazine and needle punched a rug. I bunny is from "Furnish a Doll's House" by Michal Morse. The shades on sconces are from tubes of cake frosting.
I used scrap book stickers for the checker board trim on the wall and on the table cloth. I cut out pieces from ME fabric to make the rest of the table cloth. I copied the windows from a magazine. I also copied the wicker chairs from an advertisement for a class. I had to make the wind chime after I saw it.
The shelf and table came from full size furniture pattern books. I had a hard time deciding on how to arrange the fabric on the chair when I made it. I had some ME fabric with sayings on it and I cut one out for a rug. I had to paint in some parts because of over lapping patterns.
This is the sewing box we are going to make. I have it painted for my Mary Engelbreit room, but you can paint it however you want.
These are the pattern pieces. I had a follower tell me to save my drawing in a PDF file so you didn't have to fiddle with sizing the pattern. I did, but blogger will not upload a file, only an image or video. So, copy the patterns into Paint and use the 1 inch square to get the right size. Also, transfer the dots at the top corners of the box part of the side/legs and the dot at the bottom in the middle of the legs.
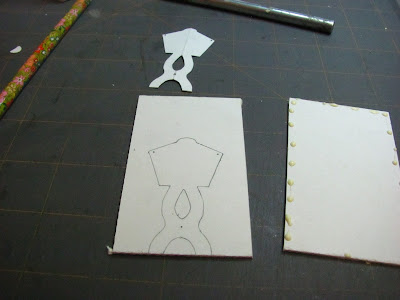
Trace your pattern onto mat board and cut out using your craft knife. Remember, use a new blade and keep your pencil sharp. I will use yellow carpenter's wood glue for gluing this together. For those of you that have a scroll saw and want to use wood for this project go right ahead. You can also cut mat board on a scroll saw. To cut out once but have two pieces when finished,(using your scroll saw) apply glue to the outer edge of a second piece of wood or mat board and glue the two pieces together.
If Santa is still listening to your requests, a scroll saw sure would be nice to add to your work space.
Do you see how I only have glue at the outer edges. I just want to hold the two pieces together until I have the pattern cut out.
Set the piece with the pattern drawn on it on top of the piece with the glue.
I don't recommend doing this using a craft knife, I don't think you could cut both pieces out without beveling the edges.
Did you notice the dots at the upper corners of the box and in the middle at the bottom of the legs? The two at the top are for the pin hinges and the bottom one is for a decorative spanner or toothpick. Use a "T" pin or other large pin to mark these holes on the pattern side.
Cut out the side/legs, using your craft knife or saw.
Use a drill the size of the straight pins you will use for the hinges to drill only through the first layer of mat board.
Turn the side/legs over and mark the holes on this side.
Even if you cut the side/legs out with your craft knife you will need to mark the holes on the other piece.
Using a drill bit the size of your straight pins drill out the holes on this side of the side/legs. Use a bit the size of your tooth pick or a 1/16 inch dowel to drill out the bottom hole.
Make sure the holes line up.
Stacking the side/legs pieces helps to keep the holes aligned. This is important for the sewing box to stand correctly. You could use a drill press for this, that's a large machine. I have the drill press attachment for my Dremel, but it doesn't drill straight through. I found this system is pretty good.
Trace the lip onto mat board and cut out like the side/legs using a scroll saw or use your craft knife and cut them out singly.
Here are the two pieces.
The lips are glued onto the side/legs 1/16 inch up from the bottom and 1/8 inch from each side. Make sure these are in the same place, if they aren't the sewing box won't sit right.
Cut a strip of mat board 1 inch wide and at least 4 inches long. From this piece we will cut 2 sides, 1 bottom, 1 top and 2 doors.
I want you to measure from the top of the lip, where my pencil point is to the bottom of the box. Mine measured 11/16".
Take away a 1/16 of an inch, that would be 5/8 of an inch for the width of my sides.
If yours doesn't measure like mine, take away the 1/16 and then cut your sides your measurement.
Cut out your sides. I am using my low beam square I purchased from Micro Mark.
Glue the sides to one of the side/legs. Match the bottoms of the sides to the bottoms of the box.
There should be at least a 1/16 of an inch of the lip showing at the top.
Measure between the sides. Mine is measuring 9/16 of an inch. Cut a bottom from the 1 inch wide strip the width you measured.
Glue the bottom onto the side/legs piece between the sides.
Glue the other side/legs piece onto your assembly.
Make sure the sewing box is sitting correctly.
Cut a top that is 1/4 of an inch wide from your 1 inch wide strip of mat board. Glue this between the side/legs pieces.
Trace the handle pattern onto mat board.
Cut out the handle.
Glue the handle to the top of the sewing box.
I am trying something new. Apply yellow glue to all cut edges of the sewing box. I want to "soften" the edges of the sewing box with sand paper later and this will help me do that. "Soften" is what a cabinet maker says when he wants to round the edge just a tiny bit so it's not so square. Even with paint on the edges the mat board always leaves a bit of paper behind when I sand the edges.
While the edges are drying we will concentrate on the decorative spanner. You can use a tooth pick or a 1/16" dowel. The tooth pick has the tendency to brake easily, but you can put a plain tooth pick in without filing the beads.
Cut a piece at least 2 inches long from the tooth pick or dowel.
Find your center, measure 9/16 inch away from center toward each end. Make a mark, these are the ends.
Again, from the center, measure 1/8 inch away and mark. Measure 1/16 inch and mark, measure another 1/16 inch and mark. Do this on both sides of center. These are the beads.
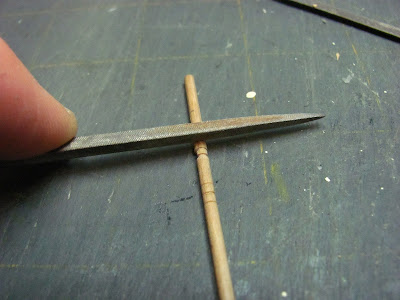
With your craft knife score around the dowel on the marks you made. Don't go too deep, we just want a line to keep the files in.
There are my scored lines.
Leave the end marks alone for now.
These are my needle files, I got them from Micro Mark, I am sure Hobby Builders has them, too.
Sorry, not a good picture.
I am going to use a triangle file first. I am trying to show you the shape, it's a triangle and has the file surface on all three sides.
This is the other file I'm going to use, it's oval and has the file surface on both sides.
I am using the triangle file first to widen out the lines.
Next, I am using the oval file to shape the beads.
Finish up with sand paper to neaten the beads.
Finally, cut the ends off. Sand the ends round just a bit to help get the dowel into the holes of the legs.
Glue your decorative spanner between the legs.
Measure for the doors, from the edge of the top to the end of the side.
Mine measured just under the 9/16 inch mark.
Cut 2 doors from your 1 inch wide strip of mat board. Dry fit the doors.
Paint the cut edges of the doors with glue and let dry.
For the knobs on the doors you can use pins with glass heads, metal knobs or I am going to use some wooden knobs I have from Houseworks.
I measured 1/8 inch down from the top of the door and marked the center. Drill a hole to fit the knob.
Important, please let the glue dry on the doors before moving on.
The glue will probably add to the width, so you will have to sand them a little to get them to fit.
Set the doors onto the top of the sewing box.
Insert a pin into the hole and into the middle of the thickness of the door.
You do not have to push the pin in very much, an 1/8 inch into the door will be enough to hold.
Open and close the doors to see if you have everything aligned.
When you are satisfied with the doors remove each pin and trim to maybe a 1/4 inch. Replace the pin.
If you don't like the head of the pin showing you can cut off the sharp end of the pin and push that into the side and door.
I would wait on doing this until you have the sewing box painted and decorated. The doors will be the last thing you put on and then you can insert the pin. These won't show.
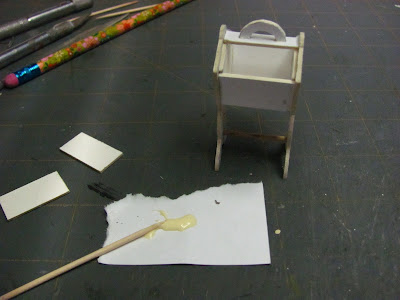
Here's my little sewing box. I don't have time to decorate it. It will be waiting for me when I need one.
I want to wish everyone a Merry Christmas. I also want to thank you all for following me . . . . . . .
So on to a Happy New Year!!!
Kris
Have Fun, Expand On It, Make It Better . . . . . . .
Just Keep Making Minis!!!
Subscribe to:
Posts (Atom)


